GitHub Repository used for this series.
What is Nornir?
Picture this: you are working as a Network Engineer for a small-to-medium MSP, or perhaps you are the only 'network-savvy' engineer in a small company. You just got fed up with doing the same repetitive task over and over again. Why waste hours of your time doing the same task day in, day out?
This is where you discover Nornir. Automation framework written in Python, which in most cases handles everything for you (not as Ansible does, but in my eyes it is a bit more modular). Nornir integrates with other relevant tools; it utilises its own inventory in YAML, which not only allows you to add more devices in ease in a more controlled manner, but because of its integration with other tools such as Netmiko, Scrapli or NAPALM, I guarantee whatever it is that you are trying to achieve within your network automation world, Nornir will make it happen.
In this article, we will only use the Netmiko plugin just to show you how to run some basic commands starting on one device, to then run it across three devices in total.
What problem does Nornir solve?
In my personal experience, my first exposure to Network Automation was through Netmiko. Sure, Netmiko is a great starting point, but you will run into its limitations very quickly.
devices = ["192.168.1.21", "192.168.1.22", "192.168.1.23"]

for device in devices:
    net_connect = ConnectHandler(device_type="cisco_ios", host=device, ...)
    output = net_connect.send_command("show version")
    print(output)
Basic Netmiko code example to show version
As you can see above, we declared a list of devices that we then query to run a show version command. Will this give us our desired output? It sure will. But what if you want to add 50 more devices, not only will this take forever, as it will execute the function one by one, but do you really also want to keep expanding the list? Not only does it not look nice and structured, but the whole point of automation is to achieve something quickly, without having to wait until it loops over all devices in the array. Not only that, what if you want to mix vendors, what if you want to handle errors on a per-device basis (and much, much more)? This is where Nornir shines. Let's take a look at the comparison below:
Netmiko vs Nornir
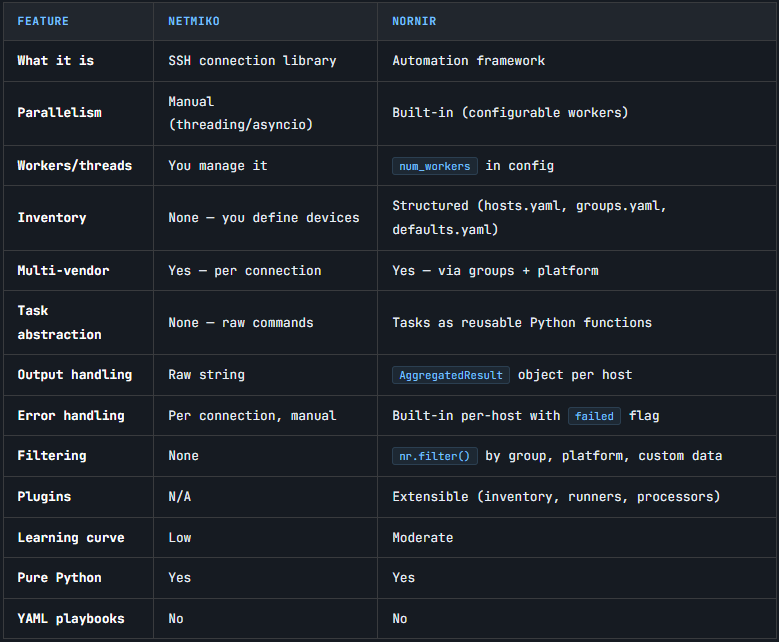
As mentioned above, Nornir takes all of the existing toolset and uses it under the hood via the plugins (for Netmiko, it is nornir-netmiko as an example).
Parallelism
In Netmiko (by default), there is no concept of multithreading. That means that you can only execute the command on one device at a time. Sure, there are ways around it, such as asyncio the library, but at this point, if you are only starting, especially with Python, you are probably getting out of your comfort zone very quickly. Nornir has this feature built in; you can define the number of workers in your config file. By default, it is set to 10. This means that Nornir will achieve the same task 10 times faster by default (assuming that you have 10+ devices that you are querying, of course). But once you get into a territory of querying hundreds of nodes, this becomes very useful very quickly!
Inventory
There is not much to dwell on here. Netmiko has no inventory whatsoever. Nornir introduces the structure of hosts, groups and defaults. All of which gives you a lot of flexibility when it comes to defining custom or unique values, along with the possibility of defining values in a hierarchical order (more on that below).
Multi-vendor support
In Netmiko, you define a vendor for each 'connection' (as seen in the example above). In Nornir, you can achieve this in your groups within the inventory. Not only is it much cleaner and more human-readable, but it also allows you to target multiple vendor devices at once.
Those are the three differences that matter most as you follow along with this series. The rest - such as filtering, processors, error handling - will reveal themselves naturally as we build things out.
Getting started with Nornir
Pre-reqs
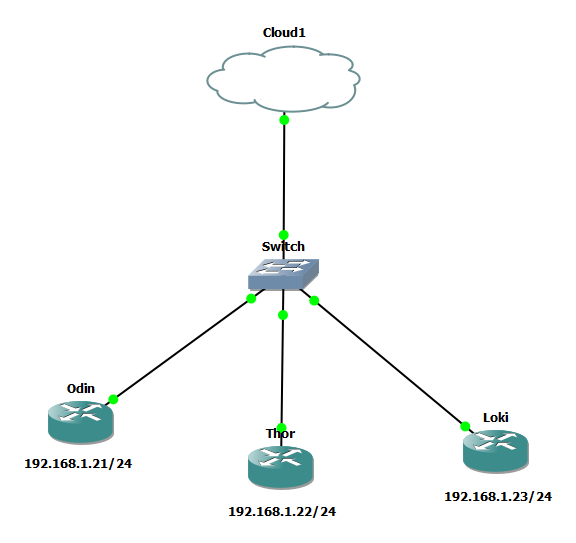
For this article, I am using a lab deployed in GNS3. You can use a virtual lab of your choice; obviously, it goes without saying that the physical hardware would work too! You will also require a machine with the OS of your choice; we pre-installed Python. (How to install Python)
The image for the nodes in the lab is c7200-adventerprisek9-mz.152-4.S6.image
We will be using the SSH protocol to connect with the devices, make sure that a) you can reach the nodes and b) you can SSH to them.
Installation
Since Nornir is a Python library, we will need to create what's called a virtual environment before we go ahead and install the library with Nornir.
In order to create and enter the 'venv', you need to enter the following in the command prompt:
Windows
python -m venv venv && venv\Scripts\activateMAC / Linux
python3 -m venv venv && source venv/bin/activateOnce that's done, you should see a (venv) prompt before your path in the command prompt, which means you have successfully entered the virtual environment!
Now it is time to install the dependency. For any pip-library in Python, you install the dependency the same way (assuming that it is published to PyPi).
pip install nornirInstall the norinr library
Once the installation is completed, you should be able to validate if the package is installed by issuing pip freeze a command which will display all of your installed libraries (my example includes more packages as I have installed them for the purpose of this lab, but as long as you can see the nornir=3.5.x package, you are good to go! Nornir also comes with more packages built in, as mentioned above (textfsm, ntc_templates and more)
bcrypt==5.0.0
cffi==2.0.0
colorama==0.4.6
cryptography==46.0.6
invoke==2.2.1
markdown-it-py==4.0.0
mdurl==0.1.2
netmiko==4.6.0
nornir==3.5.0
nornir-netmiko==1.0.1
nornir-utils==0.2.0
ntc_templates==9.1.0
paramiko==4.0.0
pycparser==3.0
Pygments==2.20.0
PyNaCl==1.6.2
pyserial==3.5
PyYAML==6.0.3
rich==14.3.3
ruamel.yaml==0.19.1
scp==0.15.0
setuptools==82.0.1
textfsm==2.1.0
Output of pip freeze
Building the inventory
The inventory has three key pieces: hosts, groups and defaults. The structure of your files should look something like this:
nornir-series/
├── inventory/
│   ├── hosts.yaml
│   ├── groups.yaml
│   └── defaults.yaml
├── config.yaml
├── main.py
└── requirements.txt
Folder structure used in this article.
The plugin that handles the inventory side of things is called SimpleInventory. This handles the inventory side of things for us by storing all relevant data in three files (hosts, groups and defaults).
Hosts.yml
---
odin:
  hostname: 192.168.1.21
  groups:
    - cisco_ios
hosts.yml basic example.
For now, we will start with just a single device. Considering that the format used to store this data is YAML, it is super crucial to keep the structure intact with the correct indentation in place, Nornir will not know how to interpret the data stored in the file.
The very first argument odin is the hostname key; everything indented beneath it belongs to that host. hostname and groups are nested keys, groups takes a list as its value (the - prefix is YAML's way of denoting a list item.)
odin - friendly name of the device, you define how you want to call it. It is irrelevant to the actual configuration, but it's just the way to name it within the inventory.
hostname - IP address (or DNS name if applicable) of a device. It is crucial to get it right in order to connect to the device when running a script.
groups - You technically don't need groups, but I would advise using them. It allows you to globally define values specific to that group. You can, for example, allocate a group of Site_A which will then store values relevant to Site_A in groups.yaml. In this example, I am using a group called cisco_ios which will store details relevant to the driver that we will be using (the driver tells Nornir which Netmiko driver to use).
Groups.yml
---
cisco_ios:
  platform: cisco_ios
groups.yml basic example.
This is where Nornir shines in my opinion. If you wish to allocate any parameters specific to a group of cisco_ios, you would put them in the groups.yml. Once you have defined what groups you wish to use in hosts.yml (by the way, you can call them whatever you want, as long as you reference it in groups.yml too.)
As I mentioned above, we need to define what platform we are using to tell Nornir which Netmiko driver to use. Without the correct platform, Nornir will not be able to execute the task since the driver handles all of the under-the-hood elements for us! You can find the relevant drivers available for Netmiko here.
Defaults.yml
---
username: nornir
password: nornir
defaults.yml basic example.
That should be enough for the inventory part. Make sure to nest them inside the inventory folder as I did.
Config.yml
---
inventory:
  plugin: SimpleInventory
  options:
    host_file: inventory/hosts.yaml
    group_file: inventory/groups.yaml
    defaults_file: inventory/defaults.yaml

runner:
  plugin: threaded
  options:
    num_workers: 10
Config.yml is not mandatory, as you can define the values above in Python within InitNornir method; however, I tend to include the config.yaml. It is a personal preference, but I have decided to mention this just in case. The file is basically telling Nornir what Inventory plugin we are using and where the inventory files are stored. The runner section is where you control parallelism - num_workers defines how many devices Nornir will query simultaneously.
Building our first script
Python
The beauty of Python is its modularity. This being said, Python has a ton of plugins and libraries that will help you achieve your end goal, whatever it might be. Nornir is our library of choice for this project. We need to start with defining the imports without telling our Script what library we use, this is not going to work! Remember when I showed you the pip freeze output? This returns the list of installed libraries for the virtual environment that you are in. The output showed nornir==3.5.0 , which is the name of the library that we need to call. The library consists of multiple functions that handle the 'dirty work' for us under the hood.
Initialization
According to the Nornir documentation, we need to initialise Nornir. This is achieved by instantiating the InitNornir class, but we can not do it without importing the class from the module first!
Our very first task to build the Python script will be to import the relevant class that we need to instantiate.
from nornir import InitNornir
Import of the InitNornir class
Now that's done, we need to create the Nornir object. To do that, we will tell Nornir where our config.yaml file is, which contains all of the relevant information about our Inventory and other important stuff (workers, etc.). By the way, the variable nr can be called whatever you wish, but for simplicity's sake, I will stick to what the Nornir documentation includes.
nr = InitNornir(config_file="config.yaml")We are telling nornir what is the location of our config file.
Is this a necessity? No, you can also define it as per above by including this information directly inside the nr variable, but you can see how much more 'clatter' it introduces.
nr = InitNornir(
    runner={
        "plugin": "threaded",
        "options": {
            "num_workers": 100,
        },
    },
    inventory={
        "plugin": "SimpleInventory",
        "options": {
            "host_file": "inventory/hosts.yaml",
            "group_file": "inventory/groups.yaml"
        },
    },
)
Example of not pointing to the config.yaml
Okay, so far so good! Let's run our first automation on a single device!
Script
So far, assuming you followed along, you should have something like this:
from nornir import InitNornir
nr = InitNornir(config_file="config.yaml")
As I have mentioned above, the nr is a variable holding an instance of the InitNornir. That means that we will use this variable and utilise the underlying methods that come with the pre-defined Class of InitNornir . That being said, let's explore the available methods that we have by temporarily adding print(dir(nr)) to the script. Once we have run the Python script, it returns the following output:
['__class__', '__delattr__', '__dict__', '__dir__', '__doc__', '__enter__', '__eq__', '__exit__', '__firstlineno__', '__format__', '__ge__', '__getattribute__', '__getstate__', '__gt__', '__hash__', '__init__', '__init_subclass__', '__le__', '__lt__', '__module__', '__ne__', '__new__', '__reduce__', '__reduce_ex__', '__repr__', '__setattr__', '__sizeof__', '__static_attributes__', '__str__', '__subclasshook__', '__weakref__', '_clone_parameters', '_runner', 'close_connections', 'config', 'data', 'dict', 'filter', 'get_validators', 'inventory', 'processors', 'run', 'runner', 'validate', 'with_processors', 'with_runner']As you can see, the class of InitNornir has multiple methods (mainly, let's focus on the methods that do not include the '__'). For the sake of this article, we will focus on the method run.
Our first method call
Similar to instantiating nr with InitNornir, we are now going to create a variable that will include the method of nr.run. It is a best practice to stick to the most descriptive names that you can, so that it is easier to read down the line. I guarantee you, once you have revisited your script a few months later, you will be scratching your head a lot (and one of the reasons is probably noticing how terrible the code was, but thats part of the growth process).
Let's create a script that will show us the interface description. We know that the Cisco command to view the interfaces is show interface description. Now, how do we tell the script to send this command? This is where the concept of plugins comes into play. As I mentioned, we will be using Netmiko under the hood to handle the device connectivity part. Remember, Nornir is our framework, and Netmiko is our current library of choice!
Now that you know how to initialise Nornir and work with the inventory, we can leverage what's called a task .
According to Nornir's documentation:
A task is a reusable piece of code that implements some functionality for a single host. In python terms it is a function that takes a Task as first paramater and returns a Result.
get_interface = nr.run(
    task=netmiko_send_command,
    command_string="show interface description",
)
Very basic example of a method using the netmiko_send_command.
Netmiko under Nornir framework
A few things to consider here. First, considering that netmiko_send_command is part of a 3rd party plugin, we do need to import that plugin to Nornir. You do this the same way as you have with the Nornir framework, by installing the nornir-netmiko library in pip. In the CMD of your machine, within the virtual environment, you need to:
pip install nornir-netmiko
Now that the package is installed, we need to import it, doing it exactly the same way as we did with InitNornir. On top of your Python script, simply add the following line, right below our initial import. It is not mandatory to keep the imports at the top of the script; it certainly is a recommended approach.
from nornir_netmiko.tasks import netmiko_send_command
Now, how do we know which attributes we can use within our `get_interface method? I was always confused as to how one would know what needs to be inserted. This is all pre-defined for us, but a good first step is to read the documentation and actually look through the underlying netmiko_send_command function. Task is a function at the end of the day, right?
Considering every tool that we use is open-source, you can actually look at the GitHub repository and with a simple Google search, I have found the function that handles the given task for us. You can also find this by digging through your dependencies in the venv file, inside your virtual environment.
from typing import Any
from nornir.core.task import Result, Task
from nornir_netmiko.connections import CONNECTION_NAME


def netmiko_send_command(
    task: Task,
    command_string: str,
    use_timing: bool = False,
    enable: bool = False,
    **kwargs: Any
) -> Result:
    """
    Execute Netmiko send_command method (or send_command_timing)

    Arguments:
        command_string: Command to execute on the remote network device.
        use_timing: Set to True to switch to send_command_timing method.
        enable: Set to True to force Netmiko .enable() call.
        kwargs: Additional arguments to pass to send_command method.

    Returns:
        Result object with the following attributes set:
          * result: Result of the show command (generally a string, but depends on use of TextFSM).
    """
    net_connect = task.host.get_connection(CONNECTION_NAME, task.nornir.config)
    if enable:
        net_connect.enable()
    if use_timing:
        result = net_connect.send_command_timing(command_string, **kwargs)
    else:
        result = net_connect.send_command(command_string, **kwargs)
    return Result(host=task.host, result=result)
this is what the netmiko_send_command function actually does.
We can see that the variables are:
Task - That's the name of the task that we're calling netmiko_send_command in this case.
command_string - According to the above, the function expects a 'String' as a data format.
Other values such as use_timing, or enable which may come in handy if you need them (for example, enable handles the 'enable' command for you). I hope it all sort of makes sense, I might have potentially deviated a bit too much.
Back to our script now! Hopefully, I have explained the reasoning behind why get_interface = nr.run consists of a task and a command_string.
from nornir import InitNornir
from nornir_netmiko.tasks import netmiko_send_command

nr = InitNornir(config_file="config.yaml")


get_interface = nr.run(
    task=netmiko_send_command,
    command_string="show interface description",
)
This should be our script so far.
Now, this is us done really... We can now print the output of get_interface, which should hopefully return what we need, i.e the interface descriptions, right? Let's add the print(get_interface) line at the end of the script and run it.
AggregatedResult (netmiko_send_command): {'odin': MultiResult: [Result: "netmiko_send_command"]}print(get_interface) result.
Printing the results
As you can see, the output is nowhere near what we expect! That's not necessarily a bad thing, as it all comes down to the output handling part of the Netmiko vs Nornir comparison that I have highlighted above.
According to the comparison above, Nornir returns an AggregatedResult object rather than a raw string. Think of it as a dictionary — your hostnames are the keys, and the actual command output is buried inside. You could dig into it manually, but that gets messy fast across multiple devices.
This is where print_result comes in - a utility function from nornir_utils that unwraps the AggregatedResult and formats it cleanly per host. Import it, call it, done. Let's add it, shall we? Simply add the following line to the import block. We are now done with the script! Here is the final piece:
from nornir import InitNornir
from nornir_netmiko.tasks import netmiko_send_command
from nornir_utils.plugins.functions import print_result

nr = InitNornir(config_file="config.yaml")


get_interface = nr.run(
    task=netmiko_send_command,
    command_string="show interface description",
)

print_result(get_interface)
Final output
After I have executed the script on the odin node, the output is as follows:
netmiko_send_command************************************************************
* odin ** changed : False ******************************************************
vvvv netmiko_send_command ** changed : False vvvvvvvvvvvvvvvvvvvvvvvvvvvvvvvvvvv INFO
Interface                      Status         Protocol Description
Fa0/0                          up             up
Lo0                            up             up       "Allfather, ruler of Asgard"
^^^^ END netmiko_send_command ^^^^^^^^^^^^^^^^^^^^^^^^^^^^^^^^^^^^^^^^^^^^^^^^^^
As you can see, the print_result function formats the output in a more readable format. Similar to Ansible, I would say (same, but different..).
- The output starts with the name of the task that was executed
netmiko_send_command - The second row consists of the host the task ran against. It also gives us an indication whether any configuration has been pushed to the device. Changed is now displaying false since we have only run some basic show commands.
- Start of the actual output block for this task. The
vvvvarrows indicate the beginning,INFOis the log level. - The actual command output returned from the device — raw, unparsed for now.
- End of the output block for this task. The
^^^^arrows close what thevvvvopened.
Adding more devices
To be honest, this article turned out way longer than I expected, but luckily, we are now at the end! The beauty of it is that all I have to do now in order to query more devices is simply add them to the host.yaml and re-run the same script.
Let's add more hosts:
---
odin:
  hostname: 192.168.1.21
  groups:
    - cisco_ios

thor:
  hostname: 192.168.1.22
  groups:
    - cisco_ios

loki:
  hostname: 192.168.1.23
  groups:
    - cisco_ios
Updated hosts.yaml
Let's validate the output:
netmiko_send_command************************************************************
* loki ** changed : False ******************************************************
vvvv netmiko_send_command ** changed : False vvvvvvvvvvvvvvvvvvvvvvvvvvvvvvvvvvv INFO
Interface                      Status         Protocol Description
Fa0/0                          up             up
Lo0                            up             up       "God of mischief"
^^^^ END netmiko_send_command ^^^^^^^^^^^^^^^^^^^^^^^^^^^^^^^^^^^^^^^^^^^^^^^^^^
* odin ** changed : False ******************************************************
vvvv netmiko_send_command ** changed : False vvvvvvvvvvvvvvvvvvvvvvvvvvvvvvvvvvv INFO
Interface                      Status         Protocol Description
Fa0/0                          up             up
Lo0                            up             up       "Allfather, ruler of Asgard"
^^^^ END netmiko_send_command ^^^^^^^^^^^^^^^^^^^^^^^^^^^^^^^^^^^^^^^^^^^^^^^^^^
* thor ** changed : False ******************************************************
vvvv netmiko_send_command ** changed : False vvvvvvvvvvvvvvvvvvvvvvvvvvvvvvvvvvv INFO
Interface                      Status         Protocol Description
Fa0/0                          up             up
Lo0                            up             up       "God of thunder and lightning"
^^^^ END netmiko_send_command ^^^^^^^^^^^^^^^^^^^^^^^^^^^^^^^^^^^^^^^^^^^^^^^^^^
As you can see, the output now displays all 3 nodes, and it does exactly what I am asking it to do! The best part is that because I have 10 concurrent workers, it took exactly the same amount of time to run it as it did with 1 device.
Closure
In the next module, I promise to be a bit more concise - now that the foundations are out of the way, we can focus on the good stuff. We will be taking the raw output that we have been printing in this article and actually making it useful by introducing TextFSM parsing. We will look at real network data, CDP neighbours, interface status, and device information which we will then transform them from walls of text into structured, readable output. See you in part 2!