
In my previous article (link here), I explained why I would never pay my ISP for a static IP allocation. The price just doesn't justify the means is the simplest reason why. Not only you directly expose your home network to the whole internet, but you are also overpaying for something that you can achieve in a cheaper way and in a more secure fashion.
Prerequisites
For the purpose of this article, you will need:
- An account set up in Tailscale (https://login.tailscale.com/start)
- A VPS from a provider of your choice (1GB of RAM and 1vCPU should be enough, also a static IPv4 address is a must)
- A target machine on which the service you wish to expose to the Internet is hosted
Tailscale setup
Tailscale is extremely easy to set up. It requires virtually no input from a user (other than copying and pasting the commands). I am assuming that at this point, you have already gained access to the console/SSH of your VPS.
Deploy Tailscale in your VPS
In the console, insert the curl -fsSl command, which downloads the script from the URL specified after:
curl -fsSL https://tailscale.com/install.sh | shThe script will now perform the installation, once complete you need to start the Tailscale client with:
sudo tailscale upThe output will present a URL that you will have to use to authenticate to your Tailscale network (aka tailnet). Once that is done, you should be able to see your newly added device under Machines.
Set the VPS node as the exit-node
You will need to enable IPv4 forwarding. I did not have to do that on the VPS provided by Fasthosts; however, it is worth checking, as with IPv4 forwarding disabled, the traffic will never be forwarded! You can validate this by inserting the command below:
sysctl net.ipv4.ip_forwardIf your ip_forward value is set to 1, you are good to go; otherwise, copy the commands below:
echo 'net.ipv4.ip_forward = 1' | sudo tee -a /etc/sysctl.d/99-tailscale.conf
echo 'net.ipv6.conf.all.forwarding = 1' | sudo tee -a /etc/sysctl.d/99-tailscale.conf
sudo sysctl -p /etc/sysctl.d/99-tailscale.conf
Of course, once inserted, validate if forwarding is enabled once again and it is set to 1.
Now we can finally advertise the VPS as the exit-node:
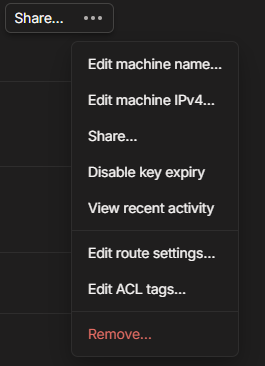
sudo tailscale set --advertise-exit-nodeLast but not least, you will have to allow the node from the admin console. Open the Machines page and locate the newly created VPS. From the menu of the exit node (three dots), select 'Edit route settings...' and enable Use as exit node.
Target machine setup
Installation
For the purpose of this demonstration, I am using a Windows 11 client. The installation of a Tailscale client is pretty much the same, with the difference being that you just simply download the installation file and run the installer locally on your Windows box. The download link for the Windows client can be found here. If you wish to download the client for a different operating system, you can do so by navigating to Machines and adding the machine manually by selecting 'Add device'.
Once the installation and authentication are complete, you are pretty much good to go with the exit-node side of things.
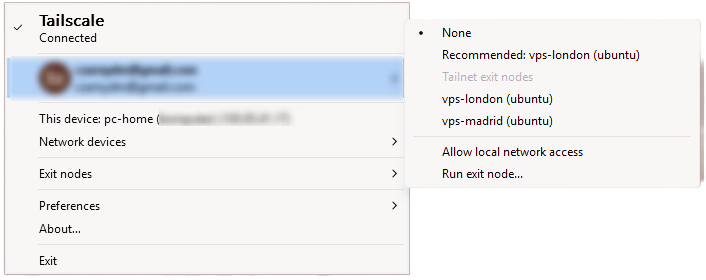
Enabling the VPS as the exit-node
In order to enable the VPS as the exit node, all you have to do is simply right-click on the Tailscale icon, select Exit Nodes and select the VPS.
That is it, really. You can validate if your public IP has changed by running the following command in the CMD:
curl ifconfig.meIf the output of this command returns the IP of your VPS, you have done it right!
Simple Web Server
For the sake of this tutorial, I will set up a very, very basic Flask 'app' that will display a simple one-liner header. The whole point is to show how you can expose any service via any port over to the internet.
What is Flask?
Flask is a lightweight, web framework for Python which is designed to build web applications, APIs and other services with little to no code. I am not going to show you how to install Python and its dependencies in this article, but again, it doesn't really matter what service you are exposing at this point; what matters is that you can literally expose anything as long as it is done over the TCP/IP stack. If you wish to learn more about Python, their documentation will point you in the right direction (link HERE)
from flask import Flask

app = Flask(__name__)

@app.route("/")
def index():
    return "<h1>Hello! You made it.</h1>"

if __name__ == "__main__":
    app.run(host="0.0.0.0", port=5000)
Simple Flask front page example.
Disclaimer: You will need to install Python, create a virtual environment and install dependencies in order to run this on your machine.
The script above will simply display a header saying Hello! You made it. That is it... Nothing fancy. As you can see, it is using port 5000, which is the default; you can change it to whatever you like.
Once I have run the python script, it listens on port 5000, and it should display the text above once I've browsed to the local IP of my Windows machine.

With the tunnel in place, the last piece is the reverse proxy on the VPS.
Installing Caddy
I have chosen Caddy for its simplicity - the configuration is minimal, and it handles SSL automatically when you are ready to add a domain.
Caddy is a powerful, enterprise-ready, open-source web server, reverse proxy, and load balancer. While it performs many of the same tasks as Nginx, Caddy is unique because it is written in Go and is designed to be "memory-safe" and incredibly easy to configure. Its standout feature is that it handles automatic SSL/TLS certificate renewal (HTTPS) by default, meaning you never have to manually configure encryption.
For the sake of this tutorial, we will only configure the Reverse Proxy. In essence, this forwards your traffic from the public internet (the VPS) to the destination of your choice (my local PC) over a specific port. It acts as a secure intermediary between the client (the person accessing your site) and your backend server, keeping your home network hidden and secure.
To install Caddy, you simply run:
sudo apt install caddyOnce installed, we will need to modify the Caddy configuration file. Since we're not doing anything fancy, not much needs to be done other than a few lines. The config file is /etc/caddy/Caddyfile.
You can edit the file the way you prefer; I will stick to nano. You can follow these steps to change the config:
- Open the file:
sudo nano /etc/caddy/Caddyfile - Clear the current configuration (if you are using Nano, you can hold
Ctrl+Kto delete lines. - Paste the config below, but with the actual IPs and Port.
- Reload Caddy:
sudo systemctl reload caddy
http://217.154.182.182 {
    reverse_proxy <destination_device_tailscale_IP>:<local_port>
}
Config example for reverse proxy. In my case, I have used port 5000.
Final test
Let's validate if we are actually now hitting the endpoint publically. In theory, I should be able to browse to http://VPS_IP And it should hopefully return the same page as when we accessed it locally, let's try.
And just like that, a locally hosted service is now reachable from anywhere on the internet - no static IP, no port forwarding, no exposed home network. Tailscale does the heavy lifting by creating a secure, encrypted tunnel between your machines, and Cady sits on the VPS acting as the public-facing entry point.
There is obviously a lot more ground to cover from here, such as adding a domain name and terminating SSL properly, so you are not browsing over plain HTTP. If you have any questions or run into issues following along, drop a comment below - I would love to hear how you get on!